Why Your AC Capacitor Matters More Than You Think
HVAC capacitor replacement is a common air conditioning repair. While it may seem simple, it involves high-voltage components that are dangerous without proper knowledge. This small, cylinder-shaped part is the heart of your cooling system's startup process.
Quick Answer: HVAC Capacitor Replacement Overview
• What it does: Stores electrical energy to start and run your AC's compressor and fan motors
• Signs of failure: Humming sounds, AC won't start, random shutoffs, warm air, high energy bills
• DIY difficulty: Moderate to high - involves dangerous electrical work
• Safety requirements: Power must be completely shut off, capacitor must be properly discharged
• Cost: Parts ($8-$100), Professional service ($120-$400 total)
• Time: 30 minutes to 1 hour for experienced DIYers
Your AC capacitor provides an initial surge of electricity—up to 500% more powerful than what's needed to keep the system running. Without it, your compressor and fan motors won't start. Most capacitors last 10 to 20 years, but when they fail, you'll likely hear a humming sound from your outdoor unit with no cool air inside.
While replacing a capacitor might look straightforward, these components can store a dangerous electrical charge even when the AC is off. One wrong move could result in serious injury or expensive damage to your system.

Understanding Your AC Capacitor
Before attempting an hvac capacitor replacement, it's important to understand this small but mighty component.
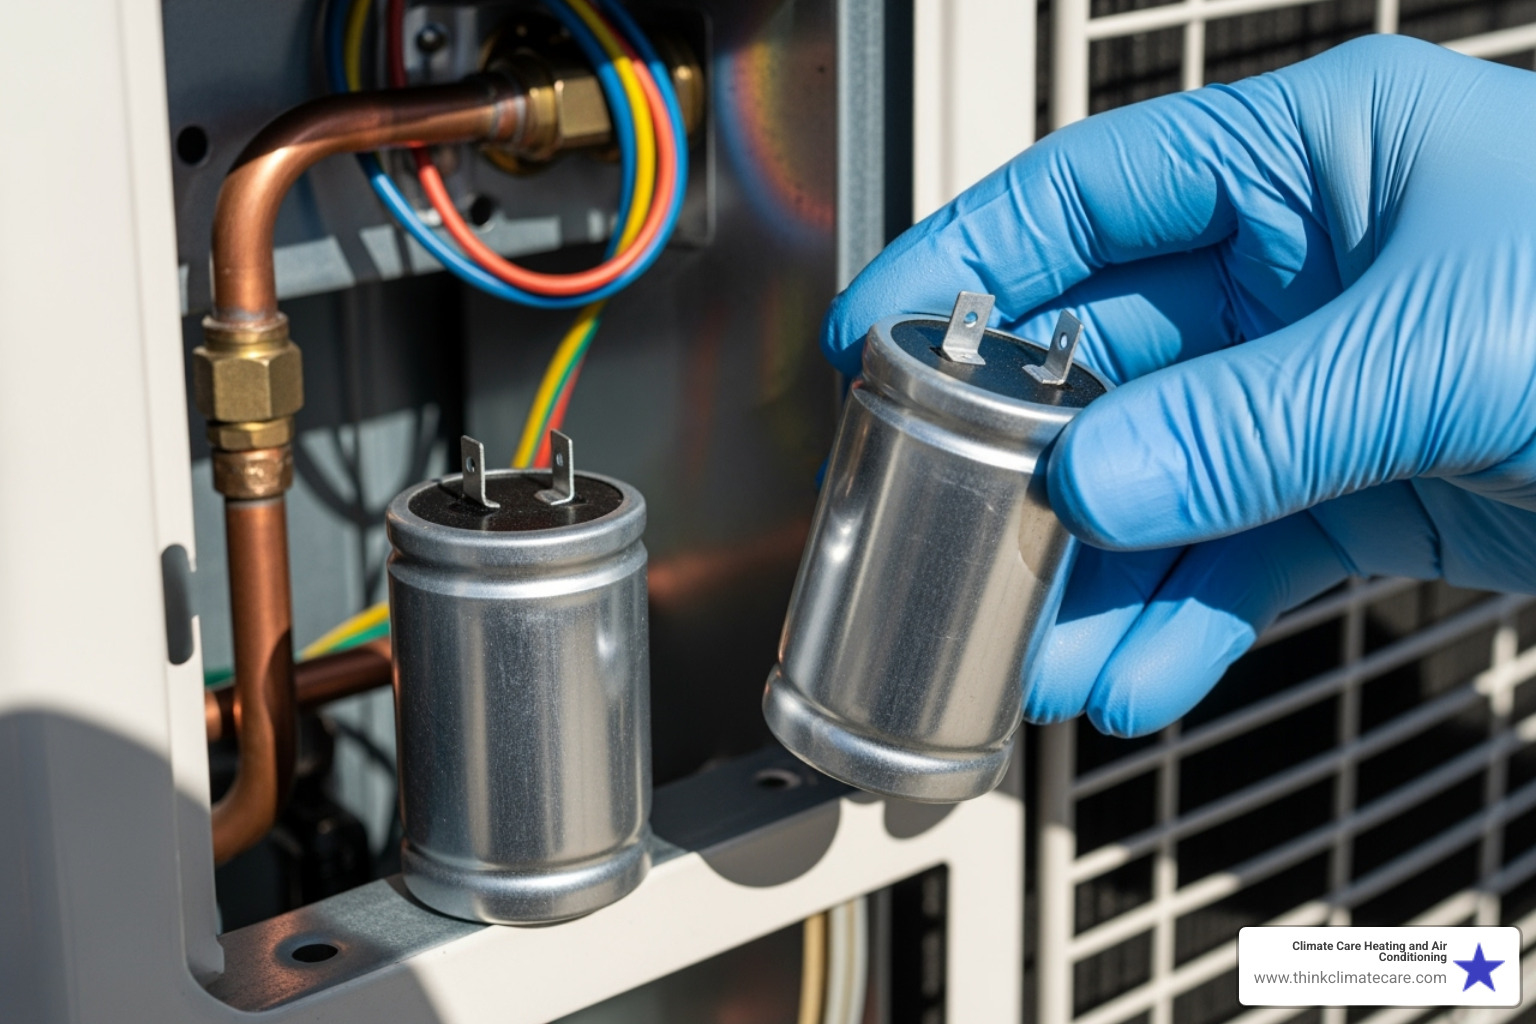
What is an AC Capacitor and What Does It Do?
An AC capacitor is an electrical component that stores and releases energy in powerful bursts. Think of it as the initial oomph needed to get a heavy object moving. It provides the electrical muscle to start your AC's heavy compressor and fan motors, delivering up to 500% more power than what's needed for continuous operation.
Once the system is running, the capacitor continues to regulate power flow, ensuring everything runs efficiently. Without this component, your AC motors would struggle to start and run. For a deeper dive into the science, you can find a simple explanation of how capacitors work online.
Types of AC Capacitors
Your AC system may use one of several types of capacitors. Knowing the difference is key for a successful hvac capacitor replacement.

• Start capacitors deliver a powerful jolt of energy for a few seconds to get the motor spinning. A humming sound without the AC starting often points to a failed start capacitor.
• Run capacitors provide steady electrical support throughout the cooling cycle. A failing run capacitor can cause random shutdowns, inefficiency, or overheating.
• Dual-run capacitors are the most common type, combining two run capacitors into one unit. One side powers the compressor, and the other powers the outdoor fan motor. You can identify it by its three terminals: C (Common) for incoming power, HERM (Hermetic) for the compressor, and FAN for the fan motor.
Signs of a Failing Capacitor
A failing capacitor usually provides warning signs. Catching them early can prevent a complete breakdown on a hot day.
• AC won't start or struggles to start: You might hear a click from the thermostat, but the unit doesn't turn on.
• Humming or buzzing sounds: The outdoor unit hums, but the fan or compressor doesn't engage. This indicates the capacitor is trying to send power, but the motors aren't getting the necessary boost.
• Random shutoffs: The AC starts but shuts down before reaching the set temperature.
• Warm air from vents: This can happen if the fan motor runs but the compressor doesn't, often due to a bad capacitor.
• Higher energy bills: Failing capacitors make motors work harder, increasing electricity consumption.
• Visible damage: A visual inspection might reveal a bulging top, oily leaks, or bent/burnt terminals.
For a look at other potential AC issues, see our guide on Signs of Failing AC System.
Before You Begin: Safety First and Tool Prep
Before touching your AC unit, we must cover safety. Safety is paramount when dealing with high-voltage parts like AC capacitors. This is not a typical DIY job and should not be taken lightly.
The Risks: Why This Isn't a Typical DIY Job
An hvac capacitor replacement carries significant electrical hazards. Capacitors can store a powerful, potentially fatal electrical charge even after the power is off. Attempting this repair without proper safety measures can lead to:
• Severe Electrical Shock: The stored charge in a capacitor can cause serious injury.
• System Damage: Incorrect wiring can short-circuit other components, leading to expensive repairs like a damaged compressor.
• Voiding Your Warranty: Unauthorized repairs may void your HVAC system's warranty.
If you feel unsure or uncomfortable at any point, call a professional. Your safety is the top priority. For more safety information, review these 8 HVAC Safety Tips for Homeowners.
Essential Tools and Safety Gear
To perform this replacement safely, you need specific tools and safety gear. Do not attempt this repair without them.

Safety Gear:
• Safety Glasses: Protect your eyes from sparks or debris.
• Insulated Electrician's Gloves: Crucial for protection against electrical shock. Ensure they are rated for high voltage.
Tools:
• Insulated Screwdriver: Essential for safely discharging the capacitor.
• Multimeter (with Capacitance Function): Vital for confirming power is off and for testing capacitors. It must have a capacitance setting (µF or MFD).
• Needle-Nose Pliers: For manipulating wires in tight spaces.
• Socket Wrench or Nut Driver: To remove the access panel and capacitor bracket.
• Smartphone: To take photos of the wiring before you begin.
• New Replacement Capacitor: Ensure you have the correct part before starting.
The Step-by-Step Guide to HVAC Capacitor Replacement
With safety covered and tools gathered, let's walk through the hvac capacitor replacement process. Follow these instructions carefully.
Step 1: Power Down the System Completely
This is the most critical step.
1. Turn Off Thermostat: Set your thermostat to "Off."
2. Turn Off Breaker: At your main electrical panel, find the breaker for your outdoor AC unit (often labeled "AC" or "Condenser") and flip it to "Off."
3. Use Disconnect Box: Near your outdoor unit is a disconnect box. Open it and either pull the plug out or flip the lever to "Off."
4. Verify No Power: Use your multimeter to test for voltage at the main power terminals inside the unit's electrical panel to confirm the power is off.
Step 2: Locate and Inspect the Old Capacitor
1. Remove Access Panel: Use a socket wrench or nut driver to remove the screws on the metal access panel of your outdoor unit.
2. Identify Capacitor: Look inside for a cylindrical or oval component with two or three terminals on top.
3. Visual Inspection: Check for signs of failure like a bulging top, oily leaks, or burn marks.
Step 3: Safely Discharge the Capacitor
This step is critical for safety, as a capacitor can hold a charge even with the power off. Never touch the terminals directly.

1. Wear Safety Gear: Put on your insulated gloves and safety glasses.
2. Use Insulated Screwdriver: Hold the insulated screwdriver by its handle.
3. Bridge the Terminals: For a dual-run capacitor, place the metal shaft of the screwdriver across the C (Common) and HERM (Hermetic) terminals. You may see a small spark. Hold for a few seconds. Then, bridge the C and FAN terminals. For a single-run capacitor, bridge its two terminals. Repeat to ensure it's fully discharged.
For a visual guide, you can reference instructions on How to safely discharge a capacitor.
Step 4: Document Wiring and Remove the Old Unit
1. Take a Photo: Before disconnecting anything, take a clear photo of the wire connections.
2. Disconnect Wires: Use needle-nose pliers to carefully pull each wire off its terminal.
3. Remove Bracket: Use a socket wrench or nut driver to loosen the metal strap holding the capacitor.
4. Remove Capacitor: Lift the old capacitor out of the unit.
Step 5: Find the Correct Replacement Capacitor
The new capacitor's specifications must match the old one.
1. Check the Label: Find the ratings printed on the old capacitor.
- Microfarad (µF or MFD) Rating: This indicates capacitance (e.g., 45/5 µF). The replacement must be an exact match or within 5-10%.
- Voltage Rating (VAC): This indicates the maximum voltage (e.g., 370 VAC or 440 VAC). The replacement must be equal to or higher than the original. Never use a lower voltage rating.
2. Check Physical Size: Ensure the new capacitor will fit in the mounting bracket.
Step 6: Install the New Capacitor and Reconnect Wires
1. Secure New Capacitor: Place the new capacitor in the mounting bracket and tighten it.
2. Reconnect Wires: Using your photo as a guide, connect each wire to the correct terminal (e.g., common wire to "C," compressor wire to "HERM," fan wire to "FAN"). Ensure connections are snug.
3. Double-Check: Compare your work against the photo one last time.
Step 7: Power Up and Test Your Work
1. Reassemble: Replace the access panel and secure it.
2. Restore Power: Re-engage the disconnect box and then flip the circuit breaker back to "On."
3. Test: Set your thermostat to "Cool." Go outside and listen. The unit should start smoothly without humming, and the fan should spin. Check for cool air from your indoor vents.
If the unit doesn't work correctly, turn off the power immediately and call a professional.
DIY vs. Professional: Making the Smart Choice
While the steps for an hvac capacitor replacement may seem manageable, the reality involves high-voltage electricity and significant safety risks. It's crucial to honestly assess if this is the right DIY project for you.
The Cost Breakdown: DIY vs. Hiring a Pro
The capacitor part itself is inexpensive, typically costing between $8 and $100. The real difference in cost comes down to labor and risk.

• Capacitor Part — DIY Range: $8 - $100 — Professional Range: $8 - $100 (included in service)
• Labor (per hour) — DIY Range: $0 — Professional Range: $60 - $150
• Service Call Fee — DIY Range: $0 — Professional Range: $50 - $100
• Total Average Cost — DIY Range: $8 - $100 — Professional Range: $80 - $400
Going the DIY route saves on labor, but it doesn't account for the cost of mistakes. A misconnected wire can destroy your compressor, a repair that costs thousands. An electrical shock can lead to a costly hospital visit. Professional installation typically falls within a reasonable range and includes the part, labor, and peace of mind that the job is done correctly and safely.
When to Call a Professional for HVAC Capacitor Replacement
Recognizing when a job is beyond your comfort zone is a smart decision. HVAC capacitor replacement often falls into that category.
• If you are uncertain about electrical safety, call an expert. High-voltage electricity is unforgiving.
• If you don't have a multimeter or don't know how to use one, you cannot safely verify that the power is off or test components.
• If the AC still doesn't work after you replace the capacitor, it indicates a different or additional problem that a technician can diagnose.
• If you see other signs of damage, like burnt wires or corroded connections, there may be a larger issue that needs professional attention.
• If your capacitors fail frequently, it points to an underlying electrical problem that requires professional diagnosis.
At Climate Care, our experienced technicians can handle your hvac capacitor replacement safely and correctly. If you're in our service area, from Manteca to Sacramento, and want the job done right, our team is ready to help with professional AC Repair Sacramento CA.
Frequently Asked Questions about HVAC Capacitor Replacement
Here are answers to the most common questions we hear about AC capacitors.
How long do AC capacitors last and what causes them to fail?
Most AC capacitors last 10 to 20 years, but their lifespan is affected by several factors:
• Extreme Heat: High temperatures, especially in California's Central Valley, put stress on the capacitor's electronic components.
• Power Surges: Electrical spikes from storms or grid fluctuations can damage or destroy a capacitor.
• Age and Wear: Over thousands of on-off cycles, the internal components naturally degrade.
• Poor Installation: An incorrectly sized or improperly wired capacitor will fail prematurely.
• Heavy Use: Constant operation during hot summers puts extra strain on the capacitor.
Can a bad capacitor damage other parts of my AC?
Yes, a failing capacitor can cause a cascade of expensive problems. The compressor, the most expensive component, is especially vulnerable. Without the proper starting boost, the compressor motor strains, overheats, and can burn out.
Similarly, the fan motor can also burn out from the extra strain. A weak capacitor forces the motor to draw more power while running hotter. Timely hvac capacitor replacement is not just about fixing the immediate issue; it's about protecting your entire system from costly collateral damage. If you hear unusual sounds, it could be a sign of motor damage. Our guide on Why AC Fan Motor is Making Grinding Noises can help you understand what those sounds might mean.
How do I test if my capacitor is actually bad?
While a bulging top or oily residue are clear signs of failure, the only definitive way to test a capacitor is with a multimeter that has a capacitance function.

First, ensure the power is off and the capacitor is safely discharged. Set your multimeter to the capacitance setting (µF or MFD). For a dual-run capacitor, test from the "C" (Common) terminal to the "HERM" terminal, and then from "C" to "FAN." For a single-run capacitor, test across its two terminals.
Compare your readings to the specifications printed on the capacitor's label. A healthy capacitor should read within 10% of its rated value. For example, a 45/5 µF capacitor should read between 40.5-49.5 µF for the compressor and 4.5-5.5 µF for the fan. A reading that is far off or zero indicates the capacitor is bad and needs replacement.
Testing removes the guesswork from hvac capacitor replacement. If you are not comfortable using electrical testing equipment, call a professional for assistance.
Conclusion
Tackling an hvac capacitor replacement can be a rewarding DIY project that saves you time and money. We've outlined the steps to help you understand the process, from identifying the problem to safely installing a new part.
However, we cannot overstate the importance of safety. This project involves high-voltage electricity with serious risks. Always ensure the power is completely disconnected and the capacitor is properly discharged before you begin. Wear your insulated gloves and safety glasses.
Know your limits. If you feel uncertain at any point, or if the repair doesn't solve the problem, the smartest and safest choice is to call a professional. There is no shame in seeking expert help for a vital and potentially hazardous system in your home.
At Climate Care, we believe in empowering homeowners with knowledge, but we also stand ready to help when you need an expert. Our goal is holistic HVAC care, focusing on performance, cost-efficiency, and environmental standards. Our membership plan offers savings, priority service, and peace of mind. We proudly serve communities throughout California, including Antelope, Carmichael, Ceres, Citrus Heights, Elk Grove, Elverta, Folsom, French Camp, Galt, Lathrop, Lodi, Manteca, Modesto, Mountain House, Natomas, North Highlands, Oakdale, Orangevale, Patterson, Rancho Cordova, Rio Linda, Ripon, Riverbank, Rocklin, Roseville, Sacramento, Salida, Stockton, Tracy, Turlock, and Woodbridge.
To keep your system running efficiently and avoid future issues, learn about Preventive AC Maintenance: How It Can Help Avoid Costly Repairs. If you're ready for expert service, we're here for your AC Maintenance in Sacramento, CA and the surrounding areas.